
Quick and Dirty Direct Seeding
- Jennifer Hoglin
- May 25, 2020
- 5 min read
Updated: Oct 25, 2023
Direct seeding is exactly what it sounds like: planting a seed directly in the ground or container where it will permanently reside. Many annuals, including most of our vegetables, are direct seeded into our gardens when temperatures are right for that particular seed. In contrast, transplants are started from seed indoors in smaller pots and earlier in the year, and then transferred into a permanent spot in the garden once outside temperatures are warmer.

First Things First
The very first thing we need to do before we put seeds in the ground, is to make the sure the soil is ready to go!
If you haven’t top dressed your beds with good quality compost in the fall, now is the time to do it. A good 1 to 2 inches every year is ideal. Mix that compost into the soil if you are doing it now. (If it is done in the fall, there is no need to mix it in, as there is ample time for it to age and get slowly mixed in over the winter.)
Use a garden rake to even out and smooth the top surface of the soil. You do not need to rototill your garden beds. In fact, rototilling ruins the tilth of your soil, harms beneficial insects, fungi and bacteria, compacts your soil and brings weed seeds up to the surface. Want to know more about no till gardening? More information can be found in the article on raised beds.
If your soil is very dry, a good soaking a few hours or a day before you plant is always a good idea.
Have your garden plan at hand so you know what you are planting and where. Learn all about making your garden plan in Crop Planning: An Introduction. Get out your seeds and don't forget your labels!
Putting in the Seeds
Ensure you have read the seed package. Is this the right time to plant? How deep should the seeds go? How far apart should they be planted? All of these things can be found on your package. Click here for everything you need to know about reading your seed package. There is a wealth of useful information on there that will ensure you are successful so read carefully.
There are a number of different strategies for spacing seeds in your garden. I go into more detail on intensive planting in the article Crop Planning: Part 1 if you would like more information. I like to use a modified square foot gardening method for my annual vegetable beds, but I still plant in long rows for anything that needs to be planted along a trellis, such as peas or pole beans. There are also some useful tools for making this process faster and easier. Check them out at the bottom of this article.
Planting in a row
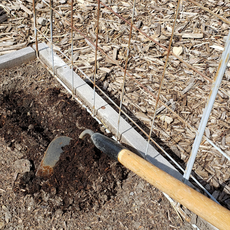
If sowing a long row of seeds, a hoe is the best tool for creating a continuous ditch in which to place the seeds. Using the corner of your hoe, drag it along the soil surface applying as much pressure as you need to create a ditch of the correct depth for your specific seeds (check your package). Place the seeds within the ditch in the spacing stated on your package. It can be helpful to place a yard or metre stick along the side of the ditch to ensure your spacing is correct. Once your seeds are in, use your garden rake to gently push the soil from the sides back into the ditch to level it. Use the flat side of the garden rake to tamp down the soil over the seeds. And done!


Planting intensively
This involves making individual holes for each seed. It is best for blocks of planting areas instead of long rows. Use the rounded end of a pen or similar shaped object to poke a hole in the prepared soil as deep as the seed package directs. You can hold your finger at the correct point on the pen to ensure you poke to only the correct depth every time, or you can use a dibber (some people call it a dibbler) which has depth indicators conveniently inscribed on it.

Once you have your holes made, drop your seeds into the bottom. If you have very small seeds, a mini-seeder can be very helpful and prevent multiple seeds in each hole.

Swipe your hands across the top of the soil to gently fill in the holes and tamp the whole area down with your hands. Be firm. We want to ensure that our seeds are in full contact with the soil, no large air pockets. Don't forget to label!

Water!
Last, but not least: water! Soak them really, really well. Seeds need to be moist to germinate and that water needs to soak through the top layer of soil to get to them. Make sure your hose is on a lighter mist setting, not a jet setting so that you do not disturb the soil. We want our seeds to stay at their perfect spacing and depth. Then keep watering consistently until germination.

Tools to Make Seeding Easier and Faster
Garden rake
This is a mandatory tool for every gardener. Great for smoothing out soil and removing rocks and large particles. Invest in a good one, you will be using it for many years to come.

Garden hoe
Also a mandatory garden tool. Useful for weeding and plowing rows.

Seeder
Fantastic for very small seeds such as carrot. This does take a bit of practice to perfect, but it will save you time and seeds once you get the hang of it. Gently tap the side of the seeder until a seeds slowly fall downwards and off the end. There is also a suction cup version for smaller seeds but I find this one much easier to use.

Seeding square
You can purchase squares that have pre-set holes in them, making the seed planting process much faster. They are a perfect one foot square, so they are a convenient tool for square foot gardeners. All you do is poke the dibber through the coloured set of holes for the seed spacing you need and drop the seeds into the holes.

Below are my DIY versions of seeding squares to save the step of poking each individual hole. I call them seeding stamps and they make for quick and efficient planting. I have one for 16 holes per square foot, one for 9 holes and one for 4 holes. The knobs on the bottom form the holes when you press the square onto the soil. For shallower seeds, I don't push down as hard with the stamp, and for deeper seeds, I just push the seed in with my finger when adding them to each hole. All you need for these are plywood, wooden sewing spools, screws and a handle. Note my written notes on each stamp for which vegetables work with each spacing. Specific instructions can be found in the article DIY Planting Stamps.


Yummy gardening everyone!
Extra Reading
West Coast Seeds (www.westcoastseeds.com) for everything seed starting, seed sales and timing charts, etc.
Bartholomew, Mel “All New Square Foot Gardening” for charts on germination times and temperatures, percentage germination, days to maturity, planting schedules, seed storage, and most vegetables, herbs and annual flowers.
Lee Valley Tools (https://www.leevalley.com/en-ca) for great quality and specialty gardening tools.
Veseys Seeds (https://www.veseys.com/ca/) for seeds, gardening tools, books and equipment.
Don’t forget your local garden centre or greenhouse!
Thanks Sarah😊 Glad you enjoyed the article. There is also one coming up on intensive planting which goes into a lot more detail on Square foot gardening so keep an eye out for that one!
This has been the most helpful gardening article ever. I feel like you've simplified it perfectly that i leave this website feelike inspired and confident that, "hey...i could do this!"
Ive been looking into squarefoot gardening a lot and i LOVEyour stamp! Thank you very much! Looking forward to more article reading!